Part 3 of our post investigates the web element and drop down commands. The commands are used to develop a set of unit tests for a small site we create.
Web Element Commands
The web element commands represent the Selenium approach to interacting with the elements in a page. For example an image, a button, a text box, and most other DOM elements.
| Command | C# Code | Description |
| Selected | IWebelement el = driver.FindElement(By.xpath(“”)); bool status = el.Selected; | A selected element. |
| Submit | IWebelement el= driver.FindElement(By.xpath(“”)); el.submit(); | Similar to the click command. |
| Text | IWebelement el= driver.FindElement(By.xpath(“”)); string text= el.Text; | The innerText of an element. |
| TagName | IWebelement el = driver.FindElement(By.xpath(“”)); string tagName = el.TagName; | Returns an html tag |
Unit Test using Web Elements
Unit tests work well with Selenium and allow step by step testing of a web application. Unit tests allow for single element verification and once developed, can detect any regressions in the code. In visual studio, two solutions will be created. One will be a standard .NET framework MVC app with login.
First we take note of the URL: https://localhost:44326/ next we will create a walk through to test the registration.
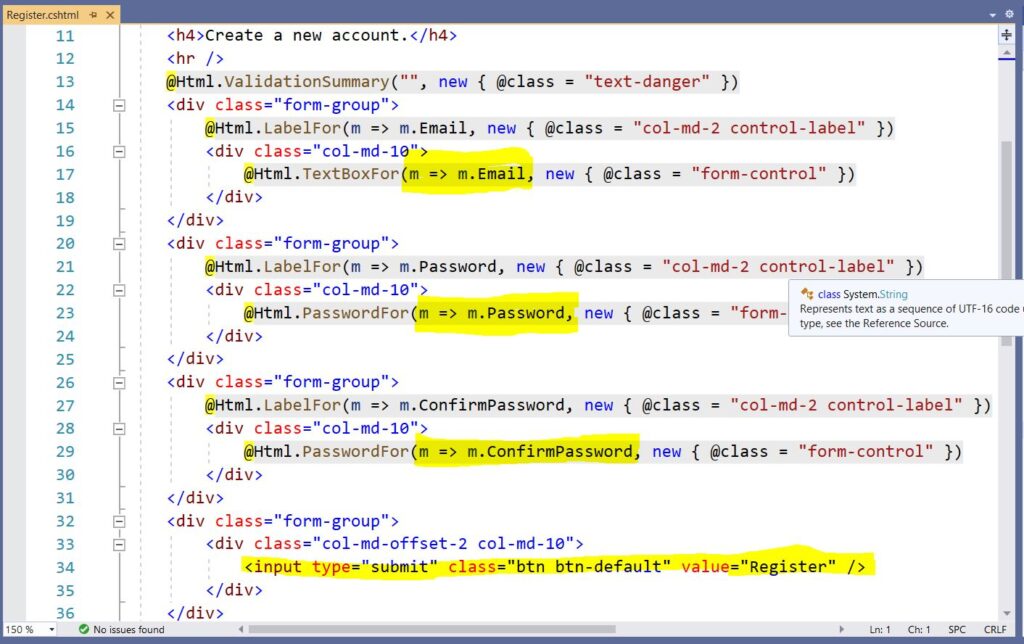
In solution explorer, go to Views -> Account -> Registration.cs. Open the view and look for the text elements and button. The elements are highlighted yellow.
Test Statement: Verify the register feature of the new website is working.
Test Logic
- Load the web page.
- Click on Register.
- Enter an email and the new password twice
- Click the register button.
- Verify the main page loads with the email visible.
Next we implement the test code but sometimes the selectors do not work well. Adding an id to the appropriate field will help.
        [TestMethod]
        public void VerifyRegistration()
        {
            IWebDriver driver = new ChromeDriver(@"C:\Users\CJ\Downloads\chromedriver_win32");
            driver.Url = "https://localhost:44326/";
            driver.Navigate().GoToUrl(@"https://localhost:44326/Account/Register");

            IWebElement txtEmail =
                driver.FindElement(By.CssSelector("input[id=Email]"));
            txtEmail.SendKeys("k@y.com");

            IWebElement txtPasswd =
                driver.FindElement(By.CssSelector("input[id=Password]"));
            txtPasswd.SendKeys("ThisIsATest3311!");

            IWebElement txtPasswdConfirm =
                driver.FindElement(By.CssSelector("input[id=ConfirmPassword]"));
            txtPasswdConfirm.SendKeys("ThisIsATest3311!");
            //#
            IWebElement submit = driver.FindElement(By.CssSelector("input[id=buttonID]"));
            submit.Click();

            IWebElement el =
               driver.FindElement(By.CssSelector("input[id=displayID"));
            string email = el.Text;

            if(email == "k@y.com")
            {

            }

            driver.Close();
        }
The following error shows the selector could not be found.
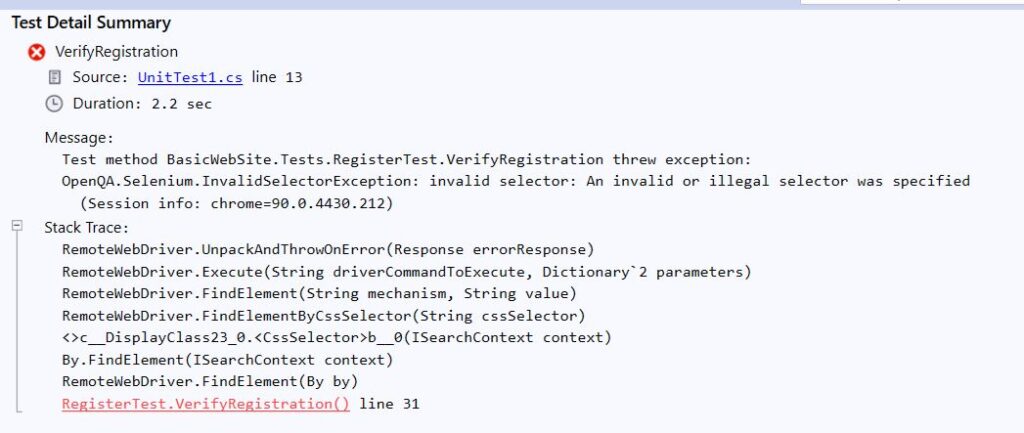
The test now works but fails to verify the email is shown on the next page.
Bonus: Fix the problem and verify the email. As an additional bonus write test cases that test invalid emails and passwords. Check the validation messages to verify the correct error is thrown.
The source code can be found in part 4. In the next section, we review the drop down commands.